

How To Make Multiple Work Paths In Photoshop
Hither are 15 of my favorite shortcuts that make working with Paths and the Pen Tool easier in Photoshop.
The Path Selection and Direct Selection Tools — To select an entire path, use the Path Selection tool. To select segments of a path (anchor points, direction lines etc.), use the Direct Selection tool. With the Straight Choice tool selected, instead of switching to the Path Selection tool, agree Pick (Mac) | Alt (Win) and clickon a path to select the unabridged path.
Selecting Multiple Paths — Shift click (or click -drag) with the Path Selection tool to select multiple paths. Shift -click on a selected path to remove it from the selection. Note: use the Select option in the Options bar to toggle between selecting paths on the Active Layers (those that are targeted on the Layers console) or on All Layers.
Selecting Ballast Points forth a Path — Click on an anchor indicate to select it (if ballast points aren't visible on a path, clicking on the location of an anchor signal will select that anchor point without having to select the path starting time (useful when selecting the corner point of a rectangle for example). Shift -click (or click -drag) with the Directly Selection tool to select multiple anchor points. Clicking on a selected ballast indicate with the Direct Selection tool will select that point and deselect others. Shift -click on a selected anchor signal to remove it from the selection. Annotation: use the Select pick in the Options bar to toggle betwixt selecting anchor points on the Active Layers (those that are targeted on the Layers panel)or on All Layers.
Transforming Paths — With a path selected, choose Edit > Free Transform Path to access the transform controls. These shortcuts can assistance speed up the process:
• Command + T (Mac) | Control + T (Win) displays the Gratuitous Transform bounding box.
• While in Free Transform, click the Link icon (in the Options bar) to toggle the "constrain aspect ratio" selection on/off. The state of the icon is sticky – once information technology's set, it will stay that mode until information technology'south clicked over again. This means that, regardless of the contents of the layer (paths, pixels, type, shape, etc.), transform will behave consistently. Property the Shift key while transforming will temporarily toggle the opposite beliefs.
• Position the cursor outside of the transformation handles (the cursor becomes a double headed arrow), and drag to rotate. Add the Shift cardinal to snap to 15 degree increments.
• Option -drag (Mac) | Alt –drag (Win) an anchor point to transform from the center.
• Control (Mac) | Control (Win) -elevate a corner anchor point to freely distort the paradigm.
• Command + Shift (Mac) | Control + Shift (Win) -drag a middle ballast betoken to skew the image.
• Command + Selection + Shift (Mac) | Command + Alt + Shift (Win) -drag a corner anchor signal to change the perspective of an epitome.
• Or, instead of memorizing each individual shortcut, Control -click (Mac) | Right -click (Win) inside the transformation bounding box and choose a transform choice from the context sensitive bill of fare.
• Control + Z or Command +Z will undo the terminal transformation.
• To apply the transformation, tap the Return (Mac) | Enter (Win) key, click in the preview expanse outside the transformation handles, or select another tool.
• To cancel a transformation, tap the Escape fundamental.
• When using Free Transform, the Reference Indicate can be changed to determine the location around which transformations occur. By default, the reference indicate is hidden to prevent accidental repositioning. To display the reference point, while in Free Transform, bank check the empty well to the left of the reference signal icon in the Options bar (or, choose Edit > Preferences > Tools and enable "Evidence reference point when using Transform").To reposition the Reference Betoken, drag the middle point freely within the image area, click on i of the nine reference point locations in the Options bar, or set the position numerically (also using the Options bar).
Duplicating Paths — Option -drag (Mac) | Alt -elevate (Win) a path in the image area to duplicate it. Note: this shortcut works with whatever selected path (shape layer, vector mask etc.).
Convert a Path to a Selection — With a path selected, Command + Render (Mac) | Control + Enter (Win) creates a selection from the path. Annotation: this shortcut works with any selected path (shape layer, vector mask etc.).
Repositioning Anchor Points While Drawing — When drawing with the Pen tool, if you click to ready downward an anchor bespeak and need to reposition information technology, holding the spacebar allows yous to reposition that anchor point – equally long as you have not released the mouse after clicking to set the point (otherwise y'all become the Hand tool, as expected). If you've already released the mouse, property Command (Mac) |Control (Win) volition toggle the Pen Tool to the Direct Selection tool, enabling y'all to reposition the anchor signal/direction line/path. In fact, y'all tin can agree Command (Mac) | Control (Win) to toggle from any of the post-obit tools: Path Selection, Pen, Add Anchor Indicate, Delete Anchor Bespeak, Convert Anchor Point,to the Direct Selection tool.
The Convert Betoken Tool — With the Pen tool (or Freeform Pen tool) selected, position the cursor over an anchor betoken and hold Pick (Mac) | Alt (Win) to toggle the Pen tool to the Catechumen Point tool. Click on a curved point with the Convert Ballast Point tool to convert it to a corner point, click -drag with the Convert Anchor betoken to catechumen a corner signal into a curved bespeak. Click on a direction line with the Convert Ballast Indicate tool to pause the direction lines (enabling y'all to reposition one independently of the another).
Preview the Path when Drawing — With the Pen tool selected, click the Gear icon in the Options bar and enable the Rubber Band selection to preview the direction of the path that will exist fatigued every bit you lot move your cursor in the paradigm surface area. (I plant this feature to be very helpful when I was learning the Pen tool.)

The Magnetic Pen Option — With the Freeform Pen tool selected, enable the Magnetic option (in the Option bar) to have the Pen tool help create paths by analyzing and creating paths along edge areas in images. To customize the Magnetic settings, click the gear icon (in the Options bar) and use the magnetic options to change:Width (how many pixels to look at), Contrast (what determines an edge) and Frequency (how often to lay down anchor points).
![]()
Use these shortcuts to apace change the Magnetic Pen tool options:
[ or ] decreases/increases the width
[ or ] + Shift goes to the minimum/maximum width
',' (comma) or '.' (period) decreases/increases the border dissimilarity
',' (comma) or '.' (flow) + Shift goes to the minimum/maximum edge contrast
';' (semicolon) or "' (apostrophe) decreases/increases the frequency
';' (semicolon) or "' (apostrophe) + Shift goes to the minimum/maximum frequency
Closing Paths with the Magnetic Pen — When using the Freeform Pen tool with the Magnetic Pick enabled (in the Options bar), double-click to close the Path. Hold Option (Mac) | Alt (Win) to close the path with straight-line segment.
The Curvature Pen Tool — This video (The New Curvature Pen Tool in Photoshop) demonstrates how to use the Curvature Pen Tool in Photoshop. Here are several of the shortcuts shown in the video:
• While adding an anchor point, click in one case if you want the adjacent segment of your path to be curved. Double-click if y'all want to draw a directly segment next. Annotation: The offset segment of your path (created past the first two anchor points y'all identify), always appears equally a direct line on the canvass initially. When you place the tertiary ballast indicate, Photoshop makes the first segment curve smoothly in relation to the second segment.
• To convert a smoothen anchor point to a corner point, or vice versa, double-click the signal.
• To motility an ballast point, simply drag it around.
• To delete an anchor point, select it so press the Delete key. Note: while the ballast bespeak is deleted, the bend is retained and adapted in relation to the remaining anchor points.
The Paths Panel — To select a path on the Paths panel, click on the path's proper noun. To deselect a path in the paths panel, either click in an empty grey area of the console or, Command -click (Mac) | Control -click (Win) the path's name. To convert a path to a choice using the Paths Panel:
• Control -click (Mac) | Control -click (Win) on the thumbnail of the path to convert the path to a selection.
• To catechumen an additional path and add it to the selection, Control + Shift -click (Mac) | Control + Shift -click (Win) the secondary path's thumbnail in the Paths console.
• To subtract a secondary path from a selection, Command + Option -click (Mac) | Control + Alt -click (Win) the secondary path'south thumbnail in the Paths panel.
• To intersect a secondary path from a selection, Control + Option + Shift -click (Mac) | Command + Alt + Shift -click (Win) the secondary path's thumbnail in the Paths panel.
Creating Fluid, Precise Painting Strokes using Paths — To create a fluid, smooth stroke of paint it is oftentimes easier to stroke a path. Outset, create a path with the Pen tool. So, make sure that the painting tool that you want to employ is set up with the correct options (such as castor size and opacity etc.). Finally, from the Paths panel fly-out, menu, select Stroke path and select the desired tool. This tin be extremely helpful when trying to add a highlight along the edge of an object for example.
In order to simulate force per unit area sensitivity when stroking a path, select the path in the paths panel, choose Stroke Path from the fly out carte and bank check Simulate Force per unit area. Annotation: it is important to prepare up your castor (or whatever tool you want to use), as well every bit it's attributes earlier you stroke the path.
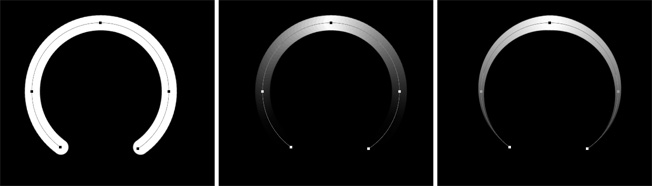
In this illustration, the first path was stroked with a brush with the Simulate Pressure level choice unchecked. The 2d and 3rd paths both had the Simulate Pressure level pick checked; the center illustration shows the upshot of setting the brushes opacity to Pen Force per unit area, the illustration on the right shows the effect of setting the brushes size to Pen Pressure.
Modify the Color, Thickness and Anti-Aliasing of Paths — To make paths in Photoshop easier to see (on college resolution monitors for example), select the Pen tool and click the Gear icon in the Options bar to customize the Thickness and Colour of the Path. Note: this will also change the width and color of paths for shape layers as well as vector masks. You can besides control the Path settings nether Preferences > Guides, Grid, & Slices (nether Paths).
To turn off the anti-aliasing, select Preferences > Performance. Under Graphics Processor Settings, click Advanced Settings and uncheck the Anti Alias Guides and Paths option. Annotation: you won't see the change until you click OK in both the Advanced Processor settings and Preferences dialog boxes to employ the alter.
Annotation: with the release of Photoshop CS6 (2012), Adobe changed the default beliefs when dragging vector curves; reshaping the path much more gracefully when dragging a line segments. If withal, you lot prefer the legacy behavior, select the Path Selection or Direct Selection tool and check Constrain Path Dragging in the Pick bar.
This video (Tips for Working with Vectors in Photoshop CC) walks through several of the shortcuts mentioned higher up – including selecting multiple shapes and paths using the Select All Layers/Active Layers option in the Options bar.
And here is a related post: 10 Shortcuts for Working with Vector Masks in Photoshop if you're interested!
Copyright © 2022 Julieanne Kost.
All rights reserved.
Source: https://jkost.com/blog/2021/04/15-tips-for-working-with-paths-in-photoshop.html#:~:text=Selecting%20Multiple%20Paths%20%E2%80%94%20Shift%20click,tool%20to%20select%20multiple%20paths.
Posted by: engellils1998.blogspot.com
0 Response to "How To Make Multiple Work Paths In Photoshop"
Post a Comment