

How To Make A Metal Look In Photoshop
These days, Photoshop has become a savior for nearly every problem related to photographs and graphics. With the increasing number of solutions to each graphic issue, information technology is safe to say that every person tin handle Photoshop in their little convenient manner. To brand life easier, here are a few easy means to create a metal texture using Photoshop.
The metal texture is a straightforward still effective way to achieve light and shadow in your pattern. Information technology gives a shiny effect and tin extensively be used as accents in logos, typography, websites as well every bit backgrounds and other graphic projects. In this tutorial, we will acquire iii different ways to achieve a metallic texture using Adobe Photoshop.
1. Achieving Metal Texture for Background Using Photoshop:
An easy and often used technique to create metal texture using Photoshop, it consists of 6 easy steps, which even a beginner-level artist can achieve. This method works perfectly smoothen for every version of Photoshop from CS3 or in a higher place.
Allow united states begin –
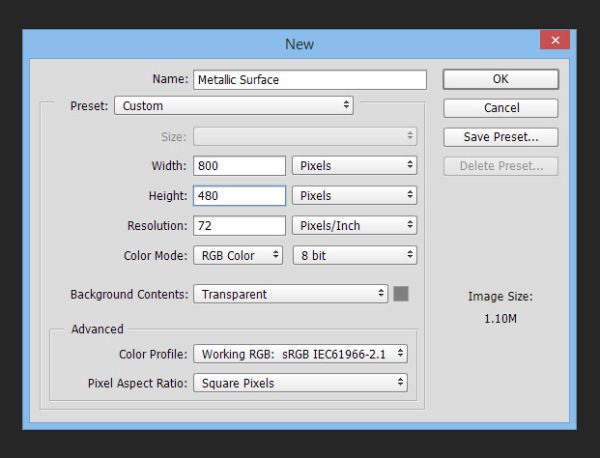
Pace 1. Create a Certificate:
Create a new document on Photoshop for this tutorial, and the document resolution shall be at 800 x 480 pixels.
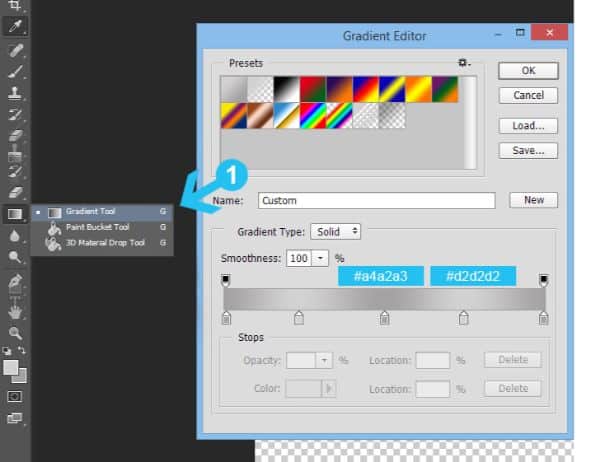
Step two. Gradient Background:
Picking the Gradient Tool (G) from the toolbox, create a slope using the colors #a4a2a3 for a darker shade and #d2d2d2 for a lighter i. (IMG. A)
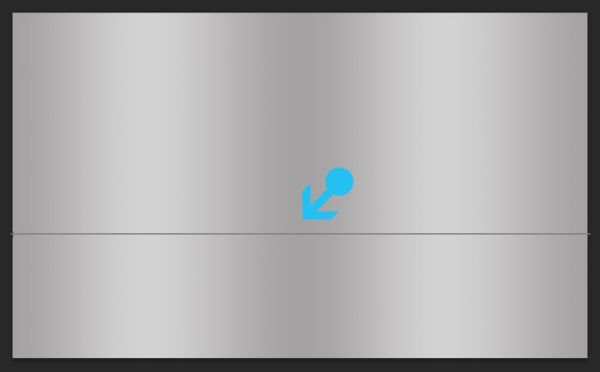
Adjacent, fill up the groundwork horizontally. (IMG. B)
A.
B.
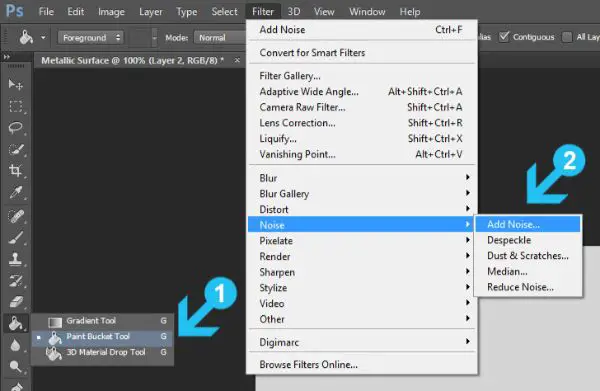
Step 3. Adding Metallic Texture:
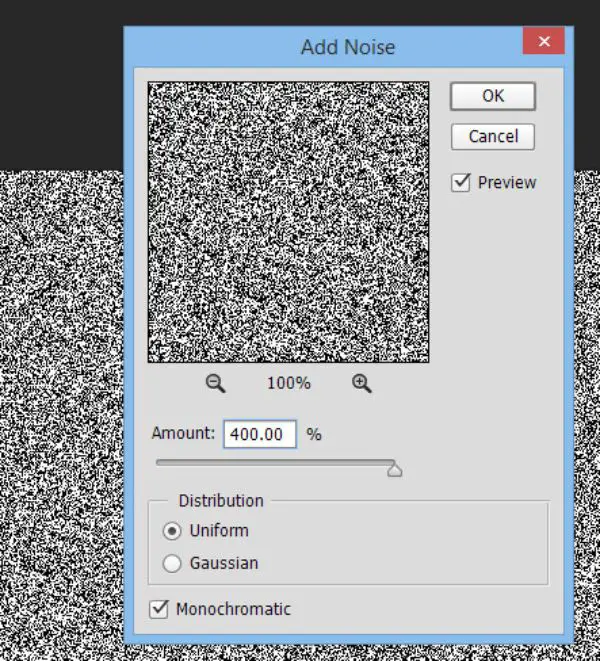
Commencement with creating a new layer (Shift+Ctrl+Due north) and fill up it with the lighter colour #d2d2d2 past using a Paint Bucket tool (Grand) (IMG.C). To add noise, become to Filter- Noise- Add Noise and keeping the corporeality up to a proper 400%, change the Distribution to Uniform and check the monochromatic option. (IMG. D)
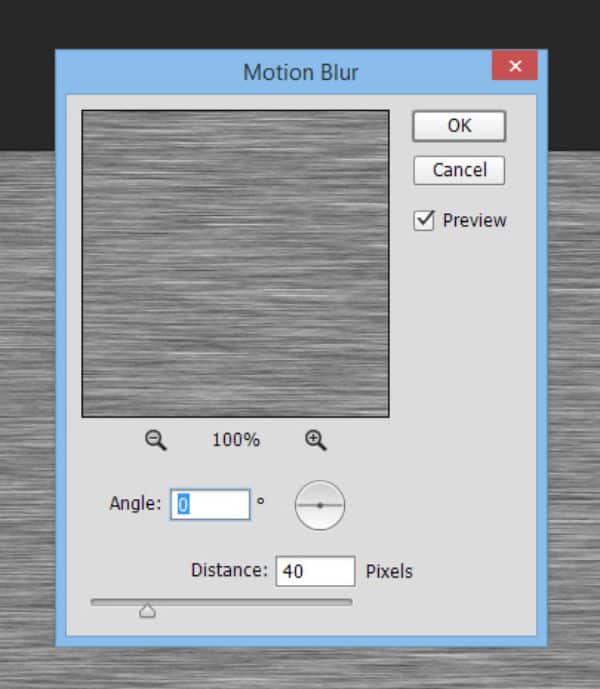
Finally, to merge the texture into one, get to Filter-Blur-Motion blur and prepare the Angle to 0 and Distance to 40 pixels (IMG. Eastward). Press OK and confirm the filter application.
C. Filling background and adding Racket:
D. Noise Setting:
E. Movement Blur Setting:
Step 4. Refine the Texture:
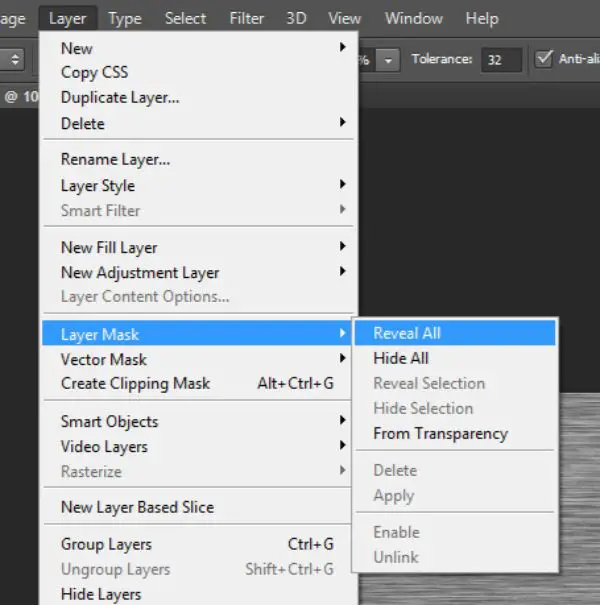
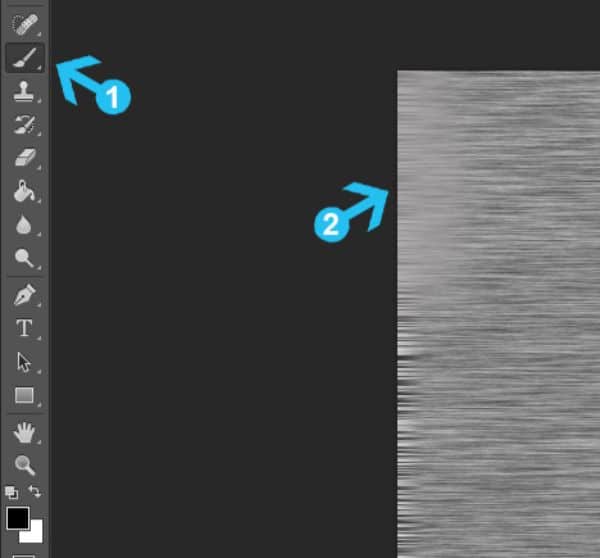
With an active texture layer, go to Layer>Layer Mask>Reveal All and add together a layer mask. (IMG.F) Showtime with a black foreground color (#000000) and option the massive soft Brush Tool (B) from the toolbox. Select the brush capacity to be between 60-70% and describe over the mask in left and correct corners (IMG. Thou). Follow this footstep with setting the Layer Blending Mode to Overlay and Opacity to 60% (IMG. H).
F. Add layer mask:
G. Draw around the left and right corners with seventy% visible soft brush:
H. Result:

Step v. Brand use of Noise:
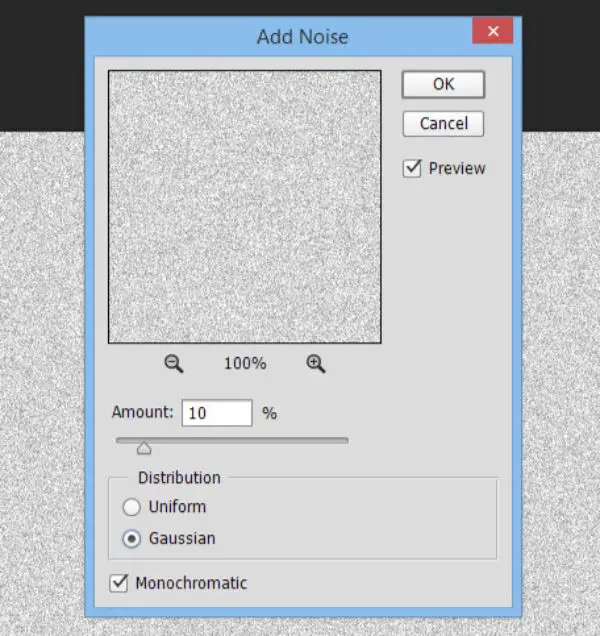
For this, you lot would have to create another layer and fill it again with #d2d2d2 color using a Pigment Bucket Tool (G). Post this, add together a noise filter- Filter>Noise>Add Noise at 10%, Gaussian Distribution & monochromatic effect. Following the Dissonance setting, modify the layer blending mode to Linear Burn and Opacity to ten%.
Step 6. Curves:
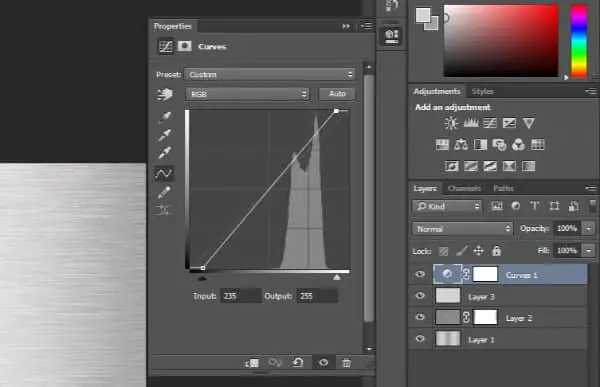
To make the background event more than intense and dramatic, hither is an boosted stride that might create that metallic shadow effect. Go to Layer>New Adjustment Layer>Curves. Gear up the shadow arrow to the right side and highlight arrow to the left side. In example you have an result with spotting the curves tab to re-edit the adjustment layer, just double-click the Curves layer icon.
I. Concluding Output:
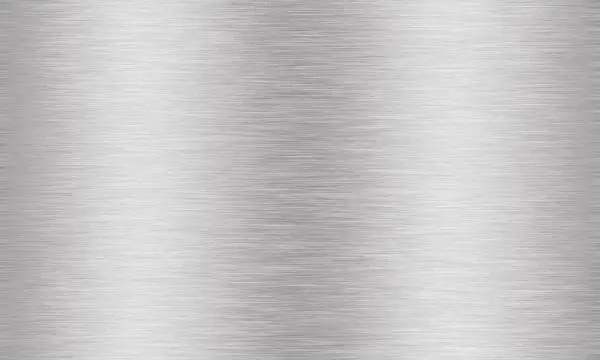
This method is the easiest style to achieve a metallic texture using Photoshop when applying it on the background. This method tin further exist manipulated to get results concerning graphics besides as typography.
Achieving Metal Texture In Typography using Photoshop:
While adding a metal texture to typography might be a slightly advanced technique, it is manageable for beginners as well. With a total of 20 steps, this method is not but lengthy, but it is too editable after beingness executed until the end as well.
Similar to a few steps from the previous method, this 1 is slightly different in order of steps and technique. Allow us begin with this tutorial –
Step 1. Start with a New Document:
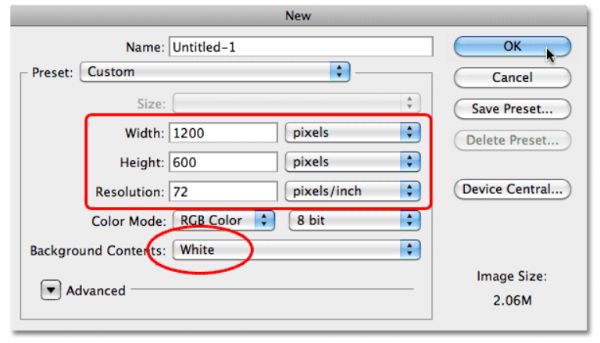
Information technology is a mandate, to start with a larger size document than you would need in case of text, and then to brainstorm with, create a new Photoshop document (Ctrl+N for windows and Command+N for Mac) of 1200px width and 600px superlative, and a ratio of 72px/inch on default. Ready the Background Contents selection to white. Even though we shall modify it in the adjacent step. Click OK when done, and a new folio shall occur.
Pace 2. Use black fill for Background:
Photoshop's Foreground and Background colors need to be reset. Practise this by pressing D on the keyboard and the Foreground would set up to default black. Press Alt with dorsum to fill the canvas with the present Foreground color (Black).
Pace 3. Insert a New Blank Layer:

Press the new layer option in the Layer Panel. This would add a new layer with the proper noun Layer i.
Step 4. Use Grey to Make full Layer:
Use the Edit carte du jour and choose 'Make full'. One time the Fill up dropbox opens up, click on the 'Color' tab under Use. When you lot select the 'Color' tab, Photoshop would open a Colour Picker for you lot to select a color to fill up the new Layer. Choose a lighter shade of grey. The one used for this tutorial is the following shade: 195 for R, G, B. Photoshop would fill the layer with a grey, temporarily hiding out the black Layer beneath.
Footstep 5. Add Noise:
Go to Filter>Noise>Add Noise. Set the amount to 150% and make certain to select Gaussian and Monochromatic options from the dialog box beneath.
Click on OK one time you get a result as below.
Step half dozen. Brand use of Motion Blur:
Go to Filer>Mistiness>Motion Mistiness. Nosotros would be using motion blur for blurring out all the dissonance that was produced in the earlier frame. Set the Bending to -10 degrees, and increase the Altitude to about 200 pixels. Click on OK when washed.
This creates a brush issue of metallic texture, as seen beneath.
Step vii. Crop the Edges:
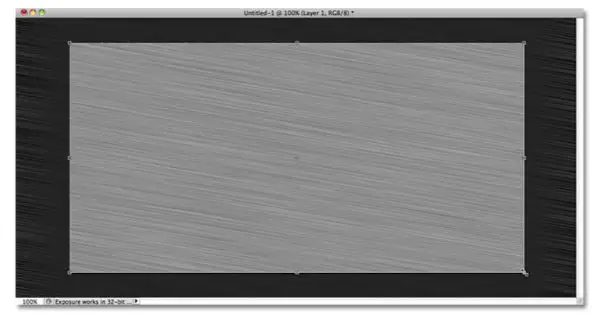
Relating to Step ane, the document must exist a tad larger than you need to satisfy the reason that Move Blur filter has trouble blurring pixels around the edges of a document, which is seen in our document. To rectify this effect, crop away those unwanted areas with the Crop Tool from the Tools panel, or press C. Printing Enter once you lot take dragged and selected the area you wish to proceed in your certificate.
Footstep 8. Insert Your Text:
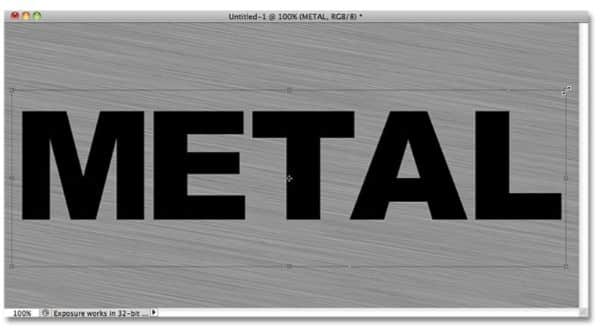
Add together text to your document with the Type Tool in the Tools panel of the Photoshop window. Select font as well as size and typeface from the dialog box above.
Every bit you select the text, you lot can besides resize it in two dissimilar means. Y'all can change the font size, or apply the costless transform tool. The Complimentary Transform tool can be activated from the 'Edit' section of the principal bill of fare bar. Y'all can utilize the keyboard shortcuts Cntrl+T (Win). You lot tin easily elevate the corner points to the expected size.
To avoid any kind of baloney while expansion or reduction, you lot can but accompany the controls with the Shift key. This would aggrandize/reduce your text or shape equally from all sides.
Step 9. Adjust the Text layer below the layer of texture:
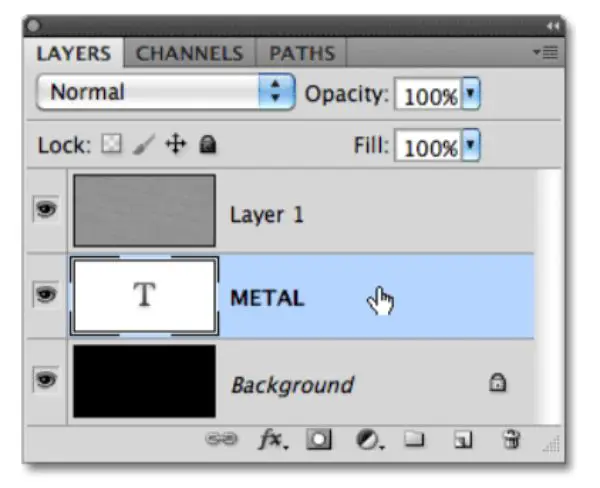
Press the text layer and drag the Layer betwixt the grey texture layer and the background layer. You would notice a highlight bar between the two layers, release the elevate of mouse and Photoshop would switch the text layer into place:
Footstep 10. Brand a Clipping Mask:
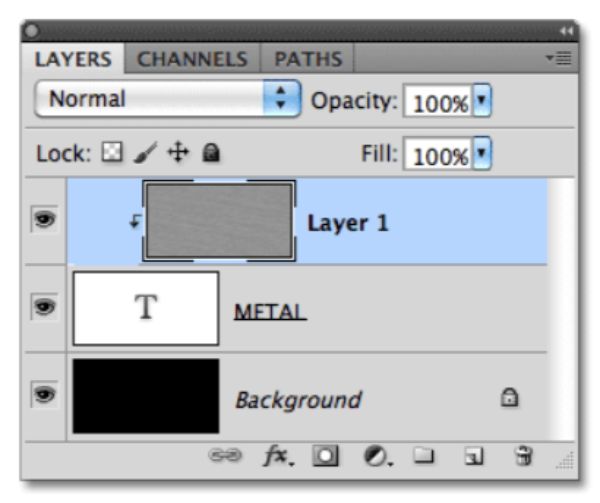
Click on Layer 1 and select information technology. So go to the layer menu and chose 'Clipping Mask'. With this central, layer one would become indented to the right, indicating that it is now clipped to the lower Layer.
Yous can now run across the greyness metallic texture through the typography easily.
Step 11. Insert Bevel and Emboss Layer Fashion:
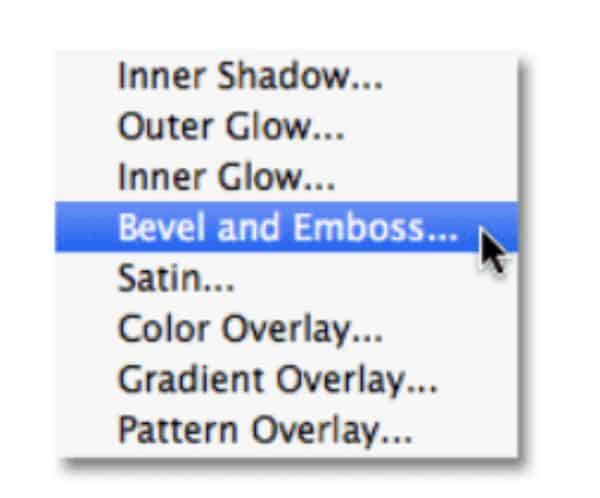
Click on the tiny text ' fx' icon in the Layers panel. This is the layer styles icon. Chose Bevel and Emboss from the list of styles that appear.
A new Photoshop Layer Style dialog box would open upwardly. To gear up the Bevel and Emboss options, outset, change the Technique to Chisel Hard, so increment the size to around 7px. Depth slider must be dragged towards the right to expand information technology to about 500%. Below, in the shading section, click on the Gloss Contour section:
This will, in turn, open up another dialog box where you can select 'Band' from nether the dropbox of Presets.
Click OK to leave out of the Gloss Contour Editor to come back to the primary Layer Style editor dialog box. Here, check-in the Anti-Aliased checkbox next to the Gloss Contour choice. Do NOT shut the dialog box yet, and nosotros accept one more step to go.
Footstep 12. Insert Gradient Overlay Layer Style:
Click directly on the 'Gradient Overlay' in the layer manner dialog box. Brand certain you don't only check in the box next to it, but click on the words for the editable options to announced.
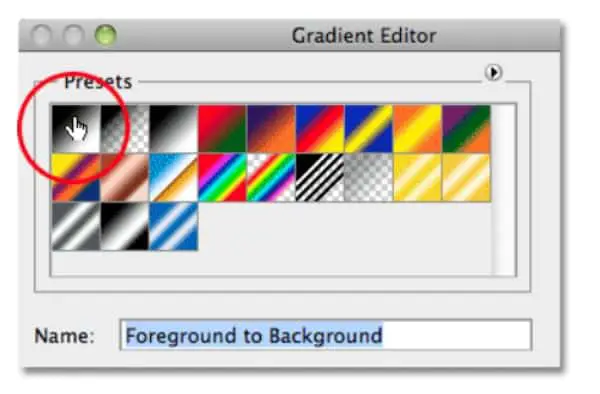
By default, Photoshop'southward Slope is fix according to the current Foreground to Groundwork (Black and White), and so to modify that, click on the color slider next to Gradient in the dialogue box.
Click on the get-go option to the left, i.e., Foreground to Background.
At present, close this dialog box and get back to the principal Layer Style dialog box. Hither, select the Blend Mode every bit Overlay and gear up the Opacity to seventy%. This adds a shimmering affect to the metal.
Final Outcome:

This is the outcome of this tutorial. It is the most basic version of the metallic typography, but more and more than overlays can be applied to these set up of layers to fine-tune the shiny metallic effect. The all-time part about this method is the text remains editable – in a sense; you tin can modify the fonts, words also as size of the words and play around with sizes without hampering the metallic texture.
These are the two methods that can be used to induce a metallic texture using Photoshop in the background as well in Text. These methods tin be improvised as per the level of advancement, merely barely accept five minutes in one case you get the hang of it. You can use a metallic texture on websites, motion graphics, logos, banners and what not! Metal textures tin can be used for diverse purposes. Learn how to make the most out of Photoshop experimenting with these metallic textures your other design projects. Metal texture adds a sense of boldness, gives the overall pattern an edge, and adds character to the overall design. Keep practicing these methods to find out which method suits y'all all-time for your purpose. The applications and possibilities are endless when it comes to Photoshop.
Source: https://line25.com/articles/how-to-create-metal-texture-using-photoshop/
Posted by: engellils1998.blogspot.com
0 Response to "How To Make A Metal Look In Photoshop"
Post a Comment