

How To Color Pop In Photoshop
How to Make a Photograph B&Due west Except Ane Colour in Photoshop
by Alexandra Bateman on April xviii, 2022
Exercise y'all want to brand an prototype black and white except for i colour? You can add a dramatic flair to your photos by desaturating all of the colors except i. This technique, known as Colour Splash, will ensure that one color really stands out confronting a muted background!
In this article, nosotros will show y'all how to make a photo B&W except i color in Adobe Photoshop. The Colour Splash technique is easy to chief, and you tin can utilise it on a variety of images in your gallery.
If you don't have it yet, you can get Photoshop from Adobe'southward site here.
Making a Photograph Blackness & White Except One Color
Once you have Photoshop installed and up-to-engagement, we're ready to begin.
Now, import your prototype to Adobe Photoshop. I'll be working with this paradigm, courtesy of Unsplash:

Step 1: Duplicate Layer
Right click on the Groundwork layer in the Layers panel on the right-paw side of your Photoshop screen. Then select the Duplicate Layer option.
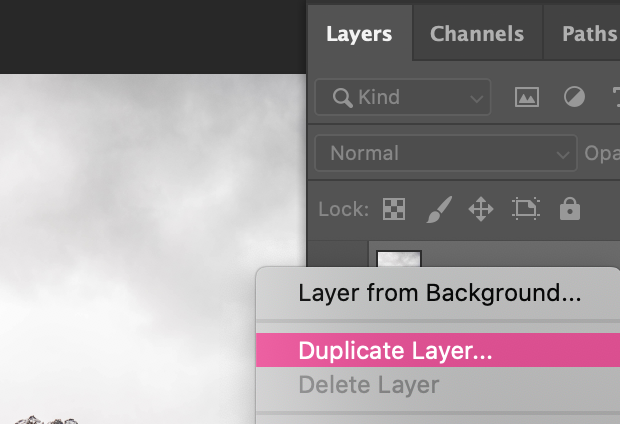
A dialog box will appear and ask you to name your new layer. Photoshop's default name for this layer will probable be Background copy, but I find it's easier to rename it for organizational purposes. I'm going to call my duplicate layer, Layer one.
Duplicating the background layer allows us to complete our edit on 2 dissever layers. While this may sound more complicated, or like extra piece of work at the start, y'all'll see why working on two layers makes our job easier in a bit.
Step two: Desaturate the Prototype
Next, select the Background layer over again and press Shift + Cmd+ U on Mac or Ctrl + Shift + U on Windows to desaturate all the colors in your image.
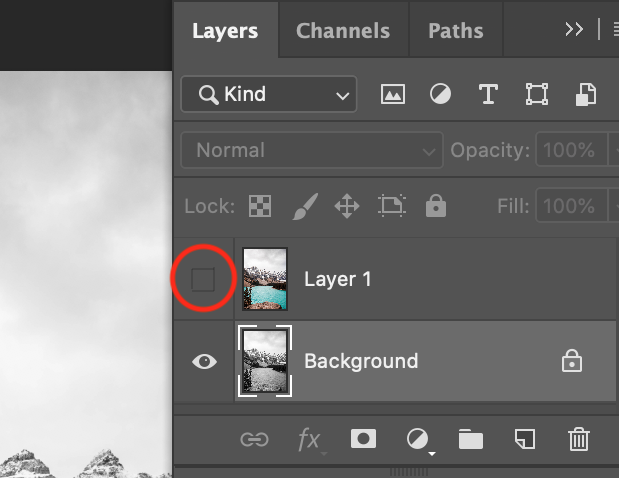
Detect that Layer 1 sits above the Groundwork layer in the Layers panel. To see the effects of your desaturation, click the heart icon on the left of Layer 1 in the console. Toggling the eye icon hides and reveals that layer.
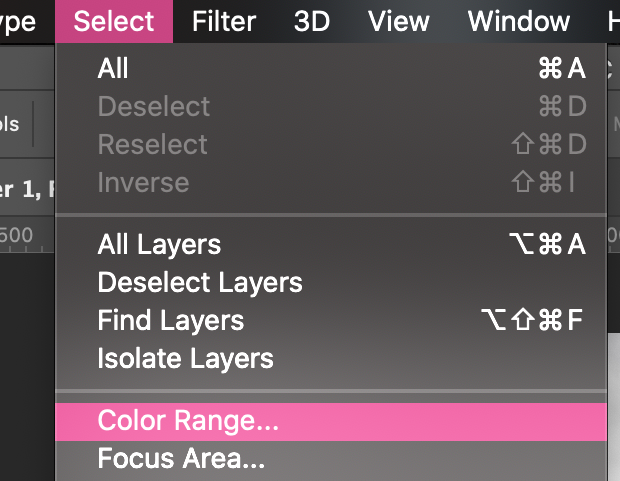
Step iii: Select Accent Color
Next, click the eye icon to make Layer one visible again, and select it in the Layers panel.
Then go to Select » Color Range from the top card bar in Adobe Photoshop.
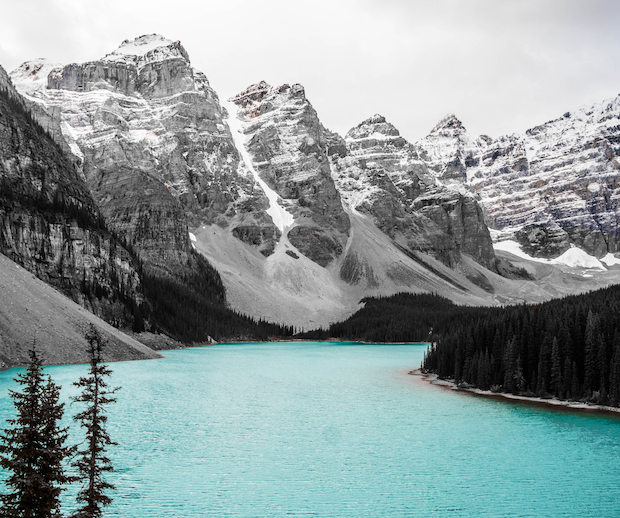
Here's where y'all'll select your emphasis color. For the purposes of this tutorial, I'll choose to make my emphasis color blue. So, the goal at the cease of this article will exist to have an epitome that's completely desaturated salvage for the blue water in the photograph.
In the Colour Range dialog box, choose the Eyedropper Tool with the plus sign. This tool is called "Add together to Sample," and it will help us select all of the blue tones in the photograph.
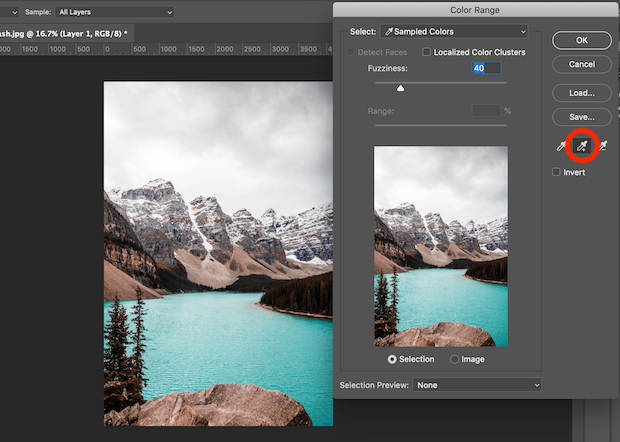
Using the Add to Sample Tool, click on the accent color in your image. Here, I'll click on the blueish h2o at multiple points in the epitome. Selecting multiple points allows me to add together multiple shades of blue to the sample. The more than shades I capture with the Add to Sample Tool, the more than accurate my effect will be.
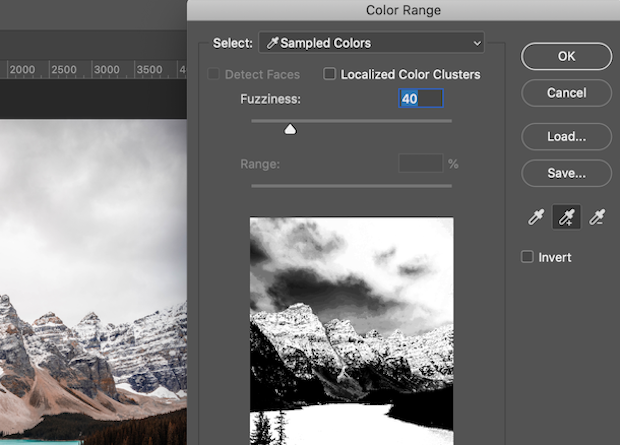
Once you've selected your accent color at multiple points in your image, select the OK button to create a pick on your photo.
Step four: Invert Your Selection
Then press Shift + Command + U on Mac, orCtrl + Shift + I on Windows, to inverse the pick you just fabricated. Now, Photoshop has selected your unabridged image except for the color you desire to preserve.
Become ahead and press the Delete button from your keyboard to remove the selected area from Layer 1. Now your photo will be B&W except for one color!
We're able to delete the portion of the top layer to reveal the bottom desaturated layer because we used 2 layers to create our event. Pretty crafty!
You can printing Ctrl + D to remove the selection from the image if your marching ants still remain on screen.
Footstep v: Touch on Up Your Image
If the Add to Selection Tool didn't perfectly exclude all other colors from your prototype, use the Eraser Tool to brush away any unwanted hues.
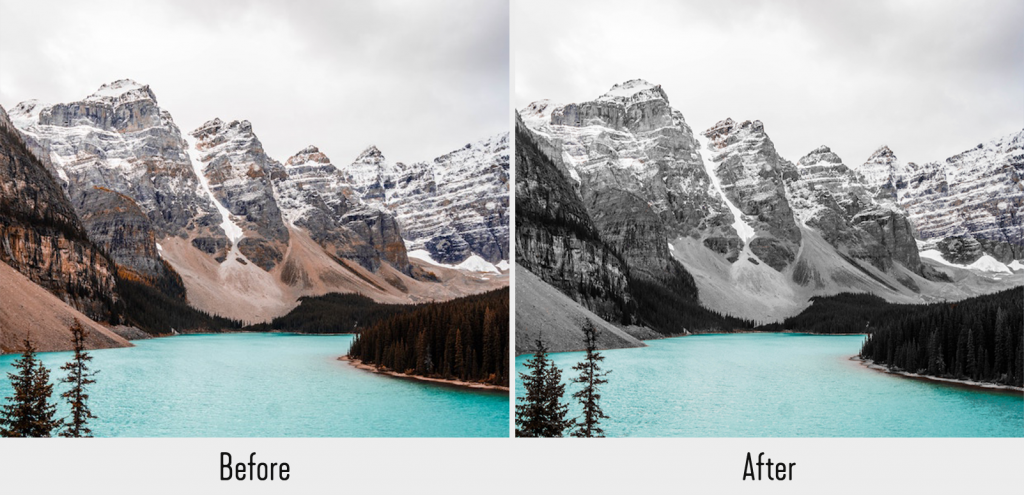
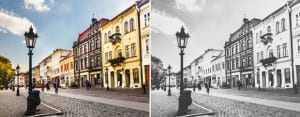
Now you've got a perfect image! Here'south the before and after of our sample epitome created by making a photo B&Due west except one color in Photoshop:
That's It!
We promise this article helped you lot to learn how to make a photograph B&Westward except one color in Photoshop. Now, you lot tin can employ this Color Splash technique to any of your vibrant photos.
A lot of photographers and social media influencers utilise this technique to create a unique way for their photos. Try this out for a few of your images and see what the feedback is!
Prefer working in Lightroom? Check out this tutorial to achieve the aforementioned consequence in Adobe Lightroom.
The only thing your rockin' epitome needs now is a place to be showcased! And, what improve place for that than on your photography website? If y'all're looking to create amazing galleries and speed up your WordPress website, y'all should check out Envira Gallery.
This amazing plugin allows you to create stunning, customizable and responsive WordPress galleries at the click of a push button. Download the Envira Gallery demo and create create your first gallery today.
Wondering how to achieve more cool effects using Adobe's Lightroom and Photoshop? Be sure to bank check out our most popular photography manufactures and how-to demonstrations below:
You may likewise want to bank check out our other Photoshop guides:
- Photoshop Actions for Wedding Photographers
- Guide to the Patch Tool in Photoshop
- How to Smooth Skin in Photoshop
- Guide to the Refine Border Tool
Don't forget to join our newsletter for more tips and tricks, and follow usa on Facebook and Twitter for even more costless photograph editing tutorials.
Using WordPress and want to go Envira Gallery costless?
Envira Gallery helps photographers create cute photo and video galleries in simply a few clicks so that they tin can showcase and sell their work.
Related Posts


Source: https://enviragallery.com/how-to-make-a-photo-bw-except-one-color-in-photoshop/
Posted by: engellils1998.blogspot.com
0 Response to "How To Color Pop In Photoshop"
Post a Comment